Installation Guidelines
TYPES OF INSTALLATION
Manifold System Through False Ceiling
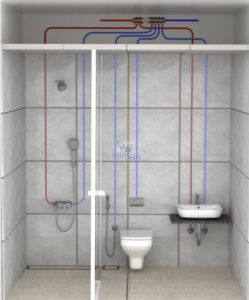
In this system, the manifolds are placed above the false ceiling of the bathroom. This is usually used in ceiling hung (suspended) pipe installations. In case of fixed ceilings like gypsum, or wood, a trap door is required to access manifolds for maintenance.
This system is recommended for budget housing projects. It can be used only in cases where a removable grid-type false ceiling is available. Retraction of pipes is possible in this system, but individual flow regulation is not.
Tee System Through False Ceiling
Manifold System Through Sunk
This system is used in cases where plumbing (drainage) is being done through the sunk and there is no false ceiling available in the bathroom. In this system, retraction is possible only if extra care is taken at the time of brickbat or coba waterproofing ensuring no damage or movement of piping network.
Site preparation
- Fixture and tile marking to be done on toilet wall based on elevation details given by the architect/consultant.
- Level pads (thiya) to be made for wall and floor tiling.
- FFL (Finished Floor Level) and false ceiling level (if applicable)to be marked
- Manifold locations to be decided before installation begins.
- Check feasibility of permissible areas for chasing.
- Select location of manifold based on availability of false ceiling, wall thickness (in case of manifold box), accessibility of shaft, etc.
Steps for installation
- If installation is through the sunk, pipes need to be laid after base coat and before brickbat/coba to ensure proper bending radius is maintained.
- Ensure that waterproofing contractor does not move pipes or damage corrugation while working.
- Bending radius should not be less than 5 times the diameter of the pipe.
- Chase walls vertically in the line of the fixtures as per layout. (In case of aluform, sleeves need to be put at time of casting). Chasing should preferably be done after brickwork and plaster.
- Cut the pipes to the desired length using the pipe cutter to avoid burr.
- Use the reamer to re-calibrate and chamfer the pipe.
- Cut the conduit to the desired length (only for portion of the pipe getting embedded in wall or floor).
- Make the connections to the end fixture and manifold using the compression fittings.
- Ensure compression ring is used before tightening each fitting.
- Embed the pipes and conduit into the chased wall and secure using U clamps.
- Re-plaster the chased wall using a steel mesh to avoid cracks (especially where wall finish is going to be POP)
- Once the fixtures are installed, the valves can be adjusted for flow regulation if angle valves are absent.
- REMEMBER to install manifold M a place which is easily accessible
Post installation checklist
- Pressure testing must be done before tiling (or water-proofing in case of sunken plumbing).
- System should be tested at pressure of 6/8 bar.
- All lines to be tested separately first. Once this is processes complete, connect the manifold and test the system through the manifold.
- Please ask the contractor to provide “asbuist” drawings of all toilet installations (especially for ceiling hung /suspended plumbing) so they act as a guide for customers when they install mirrors, soap dishes, towel rods, etc after possession.
GUIDELINES FOR CONNECTION
1. Cut the pipe perpendicularly to its axis using an appropriate pipe-cutting too. Avoid using a hacksaw or a blade for cutting.
2. Use reamer to re-calibrate and de-burr the pipe.
3. Insert the nut on to the pipe. Then put the compression ring onto the pipe. Finally, push the pipe onto the nipple all the way to the base of the fitting.
4. Use a spanner of the appropriate size to tighten the nut over the nipple fitting. Make sure that the nut is fully tightened so that the compression ring is fully pressed. Please perform pressure test on pipes before concealing the installation.
PEX Compression Systems